Wi-Fi Instructions (expand your location below)
Our contact info:
📧 WiFiSupport@intellibeam.com and 📱 401-289-9434
For best performance, it’s advisable to connect to only the SSIDs needed. For example, if you are in Pond Ave 6 “NHA Pond Ave 5-7” will be the best one to use. If you move to another building and need Wi-Fi, it is recommended to add the new SSID at that time.
Connection Information:
General mobile devices
- Go to your device settings
- Tap Wi-Fi
- Connect to appropriate SSID above
- When prompted, enter the password
- You’re now connected!
Windows 10/11 devices
- Click the network icon in the bottom right-hand corner of your screen
- Connect to appropriate SSID above
- When prompted, enter the password
- You’re now connected!
Mac OSX
- Click the wireless network icon in the top right-hand corner of your screen.
- Connect to appropriate SSID above
- When prompted, enter the password, then click join
- You’re now connected!
Pond Avenue
NHA - Pond Ave 1-3
NHA - Pond Ave 5-7
NHA - Pond Ave 9-15
NHA - Pond Ave 17-19
NHA - Pond Ave 21-27
Password is the same for all SSIDs: NHA02840
Park Holm
NHA Park Holm 5-15
NHA Park Holm 10-20
NHA Park Holm 10-22
NHA Park Holm 15-25
NHA Park Holm 17-27
NHA Park Holm 24-34
NHA Park Holm 26-36
NHA Park Holm 27-37
NHA Park Holm 39-49
NHA Park Holm 77-87
NHA Park Holm 89-97
NHA Park Holm 145A-145F
NHA Park Holm 172-174
NHA Park Holm 177-179
NHA Park Holm 181
NHA Park Holm 184-185
NHA Park Holm 184-196
NHA Park Holm 190-193
NHA Park Holm 194-195
NHA Park Holm 198-201
NHA Park Holm 202-203
NHA Park Holm 208-209
NHA Park Holm 210-212
NHA Park Holm 214-217
NHA Park Holm 218-219
NHA Park Holm 234-237
NHA Park Holm 238-240
NHA Park Holm 242
NHA Park Holm 246-248
NHA Park Holm Building A
NHA Park Holm Building B
NHA Park Holm Building C
NHA Park Holm D
NHA Park Holm E
NHA Park Holm G
Password is the same for all SSIDs: NHA02840
Edgar Court
Edgar Court 14-16
Edgar Court 18-20
Edgar Court 22-28
Edgar Court 30-32
Edgar Court 34-36
Password is the same for all SSIDs: NHA02840
Donovan Manor
NHA Donovan Manor
Password is the same for all SSIDs: NHA02840
Chapel Terrace
NHA Chapel Terrace 1-7
NHA Chapel Terrace 9-19
NHA Chapel Terrace 10-20
NHA Chapel Terrace 22-32
NHA Chapel Terrace 34-44
NHA Chapel Terrace 41-51
NHA Chapel Terrace 46-56
NHA Chapel Terrace 53-59
NHA Chapel Terrace 58-64
NHA Chapel Terrace 66-76
Password is the same for all SSIDs: NHA02840
Coddington
NHA 8 Coddington
NHA 10 Coddington
NHA 12 Coddington
NHA 14 Coddington
NHA 16 Coddington
NHA 18 Coddington
NHA 20 Coddington
NHA 22 Coddington
NHA 24 Coddington
Password is the same for all SSIDs: NHA02840
Earl Ave
NHA - Earl Ave 28 - 32
NHA - Earl Ave 36 - 40
NHA - Earl Ave Community Room
Password is the same for all SSIDs: NHA02840
Deblois
NHA Deblois
Password is the same for all SSIDs: NHA02840
Chapel Street
NHA Chapel Street 23-25
NHA Chapel Street 27-29
NHA Chapel Street 31-33
Password is the same for all SSIDs: NHA02840
- Is there a way to reset my connection if I have trouble?
- Yes, rebooting your phone and following the instructions in the section titled “Removing SSIDs”. After it is removed, you will need to re-connect if you wish to re-join. General instructions included in the section labeled “Connection Information”
- Should I add every SSID listed above?
- It’s recommended to only add the SSIDs that you need. It was setup this way for ease of troubleshooting, and to give you the best experience on Wi-F
Frequently Asked Questions
- What is an SSID?
- An SSID is simply the name of the Wi-Fi (wireless) network.
- I connected to multiple SSIDs, but I no longer want to or need to. Is there a way to delete them?
- Yes, please follow instructions in the section titled “Removing SSIDs” under “General Troubleshooting”
Have Any ? Feel Free Contact Us
General Troubleshooting
Removing SSIDs
In some cases, removing SSIDs can help reset the connection allowing you to start from scratch. It can also help in cases where you simply don’t wish to connect to a certain SSID anymore. Below are instructions for various common devices.
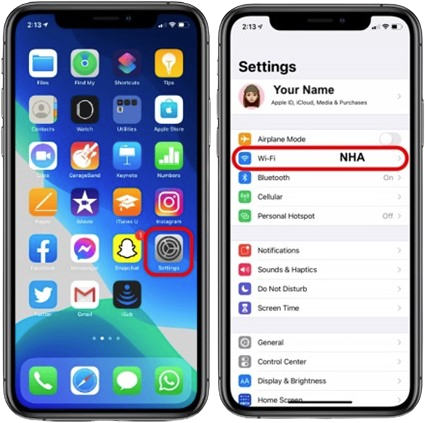
iOS (Apple mobile devices, iPhone, iPad)
- Go to your device settings
- Tap Wi-Fi
- Tap on the blue “i” in a circle next to the network you want to forget
- Tap “Forget This Network”
Android mobile devices
- Go to Settings
- Go to Wi-Fi
- Press and hold on the network you want to forget
- Tap forget this network (wording may vary depending on your device)
Windows 10/11
- Click on the network icon in the bottom right-hand corner of your screen
- Click “Network Settings”
Click “Manage Wi-fi Settings”
At the bottom of the page, click on the network you wish to forget
Click “Forget”
Mac OSX
- Click the Apple icon in the top left-hand corner of your screen
- Click “System Preferences”
- Click “Network”
- Ensure you are on the Wi-Fi tab on the left, then click “Advanced”
- In the white box at the top of the Advanced window, find the network you want to remove
- Click the “-“ sign under the white box
- Close out of the Advanced window and click apply
How to turn off auto-join Wi-Fi on iOS (Apple mobile devices, iPhone, iPad)
There are two ways to accomplish this:
1. Turn off auto-join for a SINGLE SSID
2. Turn off auto-join for ALL SSIDs
You may need to...
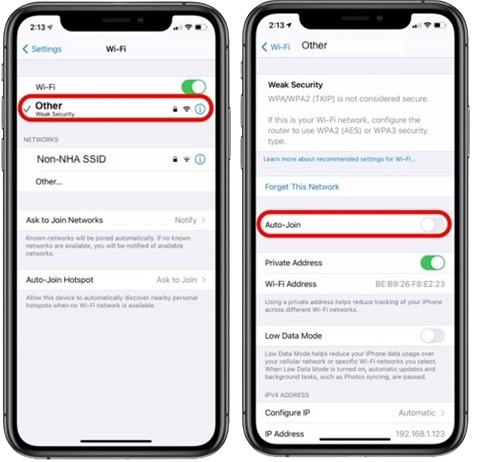
For a SINGLE SSID:
- Open Settings
- Tap Wi-Fi
- Tap the Wi-Fi network you would like to turn off “Auto-Join”
- Tap the selector for “Auto-Join”
- Repeat for all networks you would like to join manually
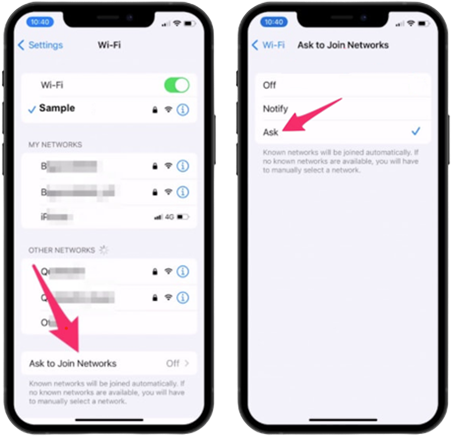
For ALL SSIDs:
- Open Settings
- Tap Wi-Fi
- At the bottom of the screen, tap “Ask to Join Networks”
- Next tap “Off”